
If you’re new to vacuum sealing foods, you might make the same mistakes I did. You get 50 pounds of food together and make a plan to spend the whole afternoon working on your preps. You get completely done two hours later and you’ve got all this food ready to store, but it doesn’t sit well, doesn’t stack well, and won’t fit in your buckets or bins without wasting a tremendous amount of space. Sound familiar? Well, if not, you should have been at my house BEFORE I learned this lesson.
Thankfully, it’s an easy thing to remedy, but something you need to consider before you get started
Related articles:
There are a few articles along the same ideas of food storage. Check these out when you have the time.
Where are you going to store your sealed foods?
I’m storing mine in the pantry and what we refer to as the “go-to-hell closet.” Yup, that’s its official name and has been for years!
It takes approximately 300 lbs of food for one person for one year, just in dried goods. I have at least 4 people to care for. That’s 1,200 pounds of food if I ever want to make it up to a one-year supply. If you have a huge basement, then you probably have plenty of space but down here in the south basements and root cellars aren’t as common as they once were and chances are your modern home didn’t come with one so you’re making do with whatever space you have. For my family, spare closets in guest rooms are a great space. They are climate controlled, mostly remain dark, and are out of the way.
But you’re still stuck with what to store them in.
Personally I have two go-to styles of storing that I prefer.
Five Gallon Food Grade Buckets

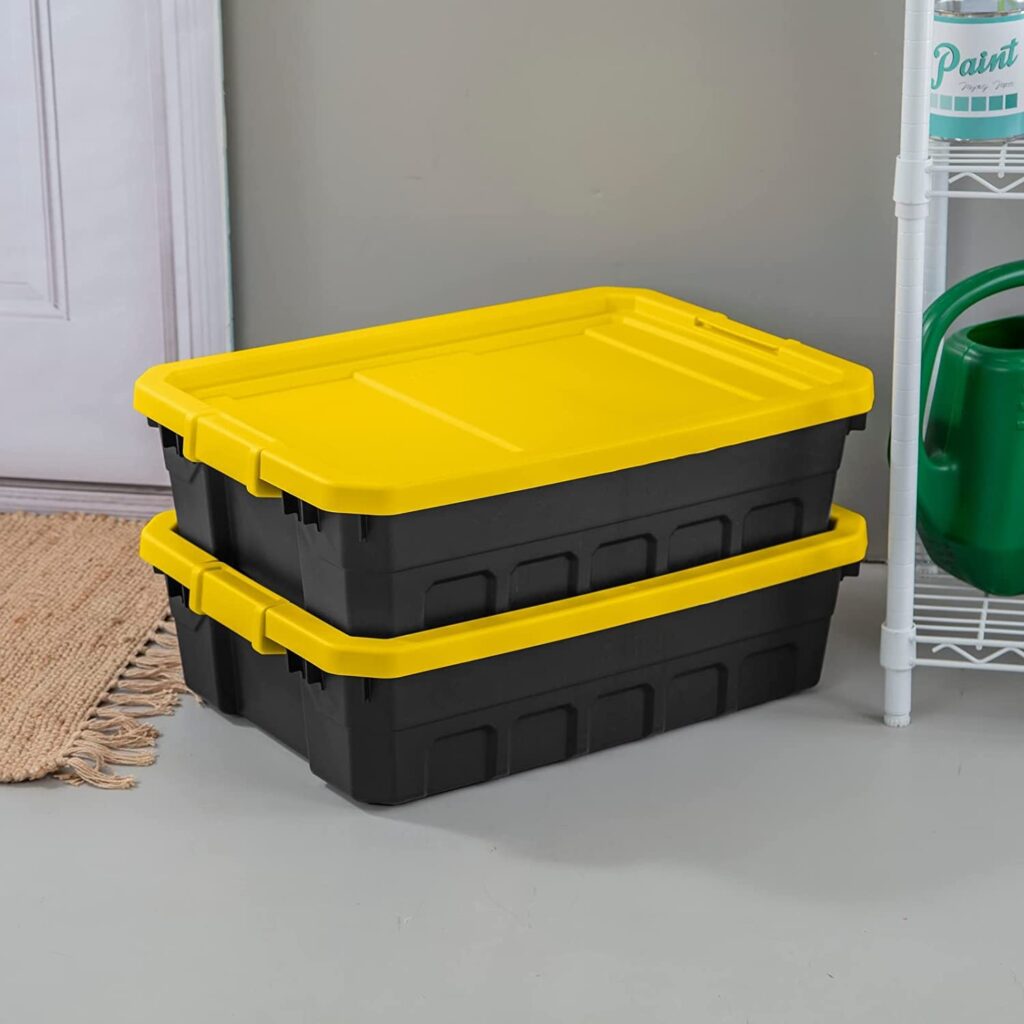
Under Bed Storage Tote
Which is better for you?
There are pros and cons to each type. I use both types of storage and if space is a concern, you’ll probably do the same.
Food grade buckets are designed just for that purpose. They’re durable, airtight when sealed properly, and they are thick enough to deter any rodent or pest. To me they’re the go-to for long term storage. They also stack well, are easy to transport, and the bucket itself serves many other useful purposes once you’ve opened it.
The down only down side to using buckets is how to put your square packages in a round hole and make the best use of space. I found myself irritated when I saw how small a package my rice came in versus how much storage space it occupied once it was portioned out and sealed.
Under-bed storage totes are great for getting things out of the way. They’re also fantastic for things that are vacuum-sealed flat. They come in varying grades, but if under-the-bed is your primary need for extra storage space, be sure to purchase something that’s not flimsy and is likely to hold up. I would look for something stackable rather than a laundry-style storage tote because of the potential for rodents. I use something similar to the ones shown above and they have held up well even for work tools in my shop for years.
Making the most out of a 5-gallon bucket
Packing a 5-gallon bucket to get the most of your storage can be a challenge. I learned a trick or two that I thought I’d share to help you avoid mistakes I made the first few times.
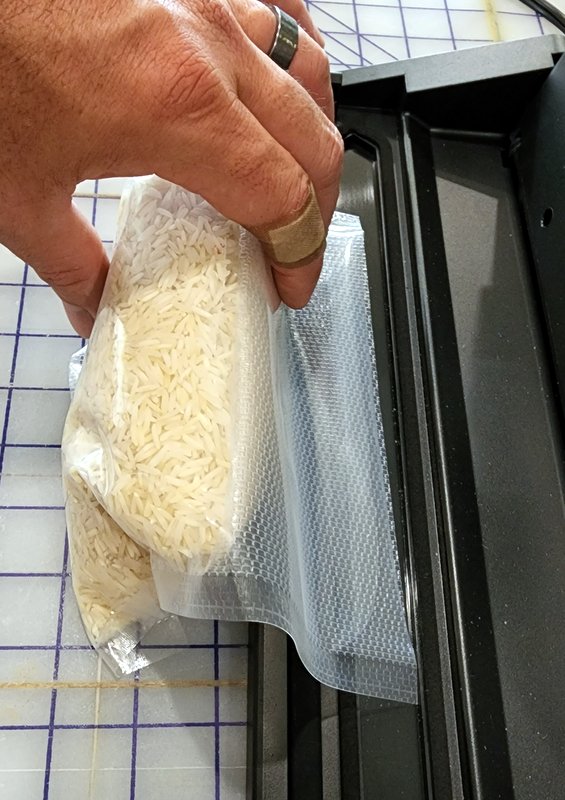
ROLLING ITEMS BEFORE YOU SEAL THEM.
We do a lot of 2-cup sized items. That’s a good meal for two people and if you’re only needing to feed one, you’ve got a second meal you can reheat later. Two cups of rice, oats or other grains would almost fill a sandwich bag, just so you know what size I’m working with.
If you let the item settle to the bottom of the bag, roll the top over, and then place the lip in the vacuum sealer, the item will shrink and keep it’s barrel-shape. It’s basically shaped like a tube when you’re done.
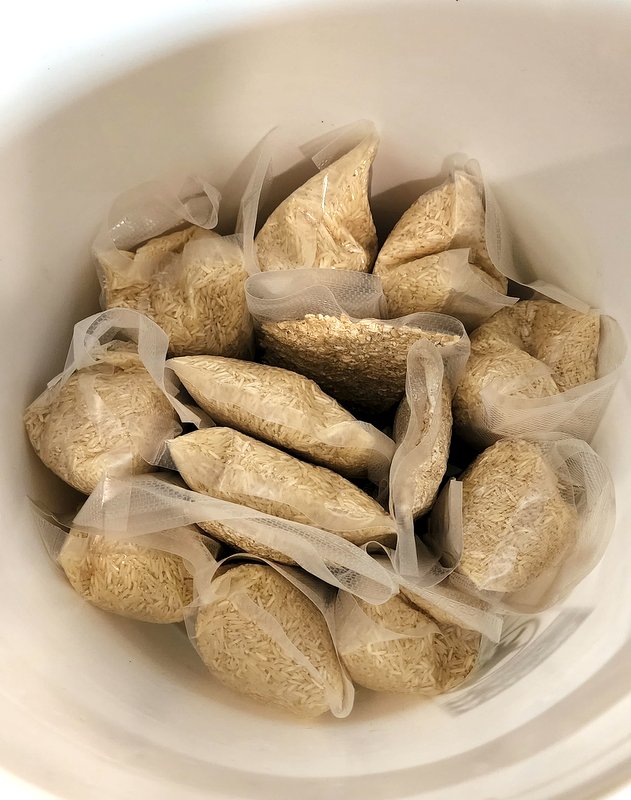
My first bucket of rice held about 40 cups of rice, almost 18 pounds or so, but I flattened them all out with the assumption they would stack easier. Well, they stack great, but a bucket is round…
Rolling them like this let us get a significant amount more space inside the bucket.
By rolling some items up in 2-cup measurements, we were able to make an outside layer of nine packages, and then stack additional 1-cup measured items in the free space. I could have probably stuffed 2 more 1-cup items in that remaining space if needed. This method already allows me to get a minimum of 50 cups per five-gallon bucket, rather than 40. That’s a 20% increase in storage efficiency!
Don’t roll everything. Pack some items flat.
Now that we’ve had more practice at this we’ve got a good system down. We’ll get a couple buckets mostly ready, stack them as efficiently as possible, and then vacuum seal the rest with the idea of filling in the empty spaces.
I hope you find this tidbit useful. I find all kinds of useful information from others, so it’s good to share some of it back once awhile.
Have any tips of your own?
Have any other genius food storage ideas of your own to share? Share in the comments below! Maybe you’ll teach us a thing or two while you’re at it!
Use the same technique when freezing Hamburger.